Strangely enough I almost sold this to the lowest bidder on Ebay a few months ago. After I laid it all out on the table I admired the detail of all my old vintage HO scale trains and HO scale structures. I decided to keep them.


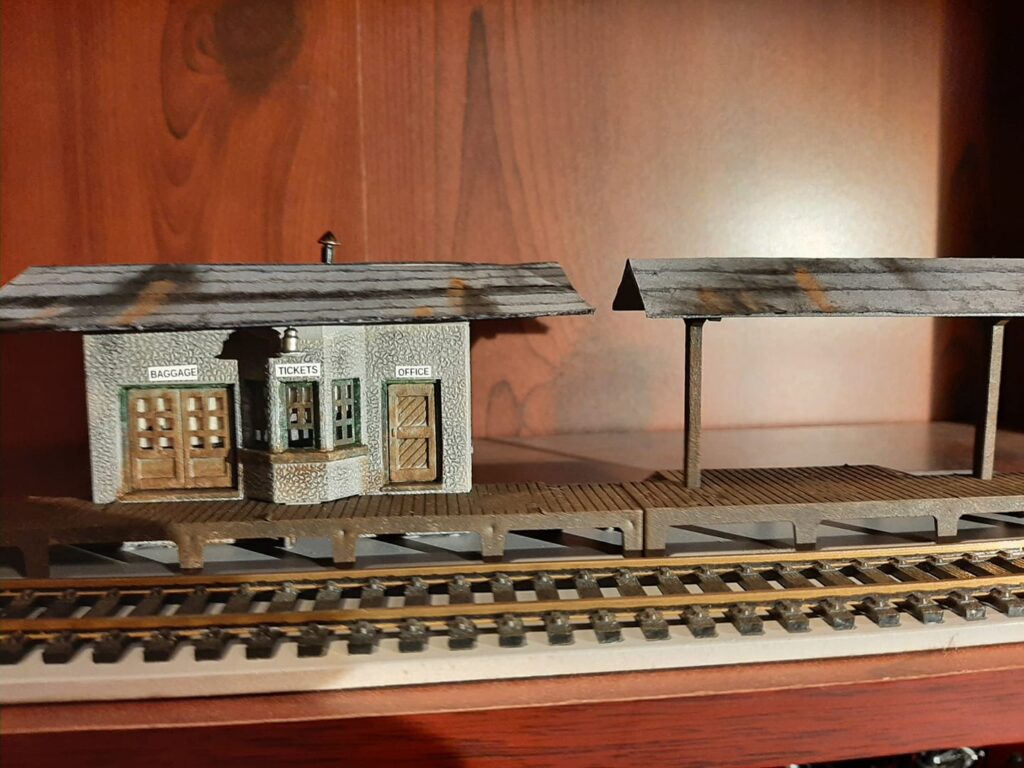
After the Christmas tree layout was taken down, and the structures put away, I kept out the Vintage Plasticville HO Scale Train Station. I estimate this is from the mid 1980’s or so.
I actually didn’t know what or how to start. After diving into a healthy dose of what the model railroad hobbyist culture has been up to for the past 3 decades and watching enough Jason Jenson Trains video’s (sadly I think he missed the opportunity to call his channel Janson Jenson Junction) to see some things I liked and thought I could do, a plan was coming together.
Watch my full in-depth overview video of this Kitbashed Plastic that looks like wood on my YouTube channel, and don’t forget to subscribe.
First I had to surgically remove the detail items and figures that were plastic cemented to the platform. Some kid in the 80’s was probably sniffing too much model glue and literally fused plastic figures and detail items to the plastic HO scale platform. Razor blades, screwdrivers and acetone didn’t make much progress to un-fuse this disaster. One figure and a pile of boxes finally came off mostly intact, but one figure and what was left of another needed something more powerful and more creative; So I broke out the power tools! Safety glasses were donned and the Black and Decker Dremel tool was used with surgical precision, saving the figures life. The platform was cleared and mostly intact. However, I’m still finding pieces of tan plastic all over the work bench, computer keyboard, shelves and everywhere.
All parts were cleaned with soap and water. Then the texturing began. I needed to make the wood parts look more like wood. Following more Jason Jenson Trains tips I textured with sandpaper. I used a razor blade to score and pull up the ends of a few boards to make them look extra weathered.
 If that goof from 35 years ago wasn’t bad enough, I proceeded to one up myself by doing the initial primer with a Rustolium aluminum from a rattle can. The aluminum was sparkly and shiny and to my dismay was not what I intended. Although the structure was ok to paint over, the platform had to be redone. Every now and then I can still see a bit of the shiny primer coming through the structure.
To add insult to injury I sadly primed platform B with white and was just as disappointed. A quick trip to the hardware store and some light coats of black primer resulted in the primer base coat I was hoping for.
Sprayed all interior walls and doors with flat black. This is so when I eventually add some lights they won’t shine through the structure.
Many multiple light coats of cheap dollar store acrylic paint later, using brushes and sponges to layer, add depth and detail, the structure was coming together. Tried to paint individual stones in the wall but they were too small. Dry brushed black to show the mortar between the stones. Painted door and windows. Used some dry brushed brown to make dirt and rust like marks. And some gray and black wash to dingy things up.
To all the windows, plastic was added to look like glass. 2 of the windows a scratch built boarded up window was made from some scrap railroad ties. The lower part of the ticket window was cut out to look more like a ticket window. Shades are just masking tape. Also added boards in what I think is a hole for wires, but also looks like a crawl space access. Black construction paper was curled in the interior to block light and add some dimension. Added signs printed on laser printer in super low font and very high quality. Bonus points to anyone who can correctly identify what the light over the ticket window was made from, comment below.
I was not happy with the roof that came with the kit for the main structure. Not only did some dumb kit (aka me) use too much plastic cement glue for the chimney, but it just looked to well done. So I changed the kit roof to a cardboard roof. Added peak to sides from local brewery coaster. The small platform roof I used as a base for this next part. Tar paper ala Jason Jenson Trains. Best trains chimney with some flat black primer and tin roof rust metal paint. Finally topped off with Monroe Models weathering powder for rust and soot.
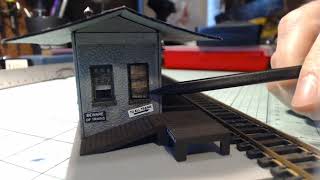
Since my layout is to be determined, I glued it down with some track to a scrap piece of primed wood.
Some comments from Facebook include that looks like a wood kit, make sure you enter in the January contest and some other very nice comments.
All in all I’m pleased with how it turned out. I learned a lot and will continue to grow and build my skills.
In the end I’m glad I decided to keep my old vintage HO model structures and start again on this great hobby.